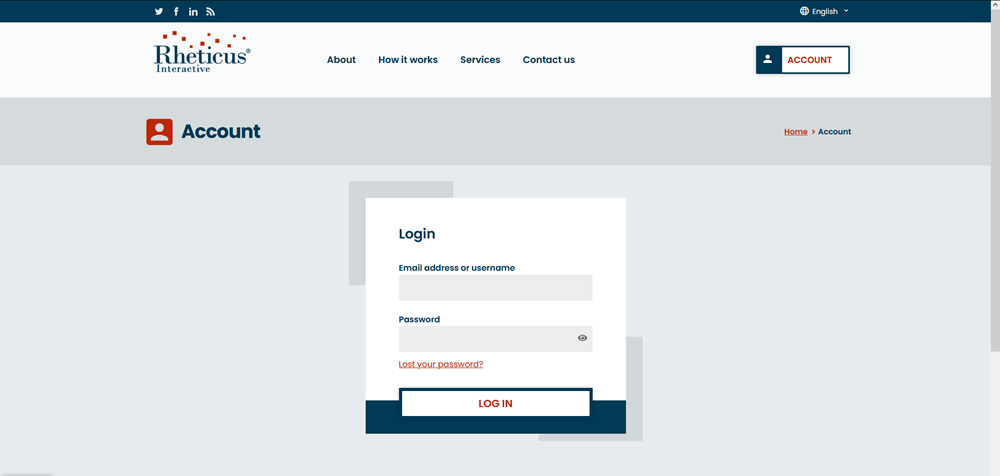
In order to login on your account click on login icon and put your “E-mail address or Username” and “Password” that you received from your provider (see the figure below).
By clicking on “Lost your password?” the user will receive the link by e-mail to reset/change the password”.
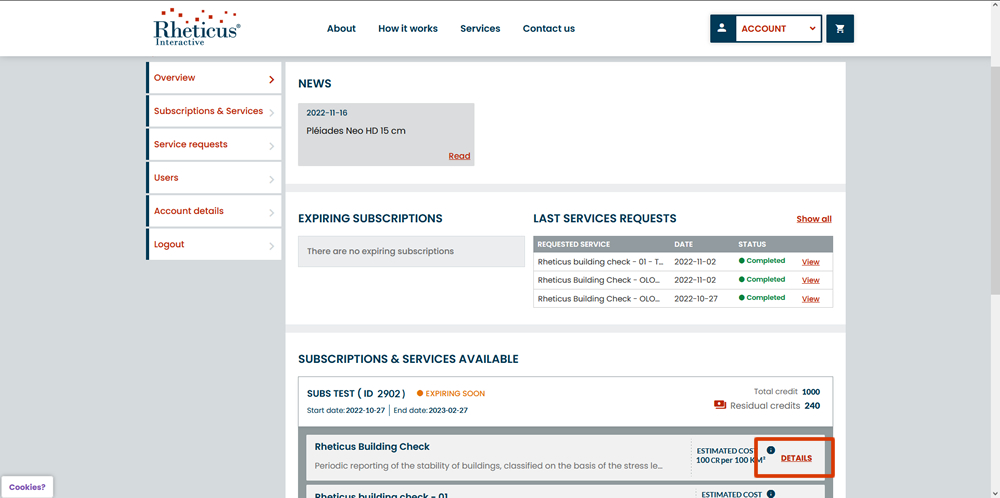
After the login to the Rheticus® Interactive platform (see ), the end-user will be able to request the Rheticus® Services activation during the period of validity of the subscript according to the processing credits available for the account. Shows the dashboard overview of the Rheticus® Interactive platform. Through the dashboard overview, the user has the following information:
News: latest news related to the Rheticus® services and the active subscriptions. At the top of the page, the user has a box to view messages like automatic alerts and news entered by the service provider (Planetek Italia). The user will receive automatic messages when the service acquired through credits is available online, or when a required end-user account for the service consultation has been activated.
Expiring subscriptions: A synthetic view of the expiring subscriptions. The user will receive automatic alerts (via email) when the subscription period is close.
Last Services Requests: List of the last Rheticus® services activation requests and their status.
Subscriptions & Services available:
Information about the subscription ID, start date, end date, total credits available with the subscription, and the remaining credits.
List of all the available Rheticus® services included in its subscription and the estimated cost in credits (e.g. Credits to monitor 100 km 2 ).
For each service listed within the “SUBSCRIPTIONS & SERVICES AVAILABLE” , by clicking on “DETAILS” (highlighted by the red polygon in Figure 2 ), the user will have access to the detailed description of the service and the available resources, as shown in below.
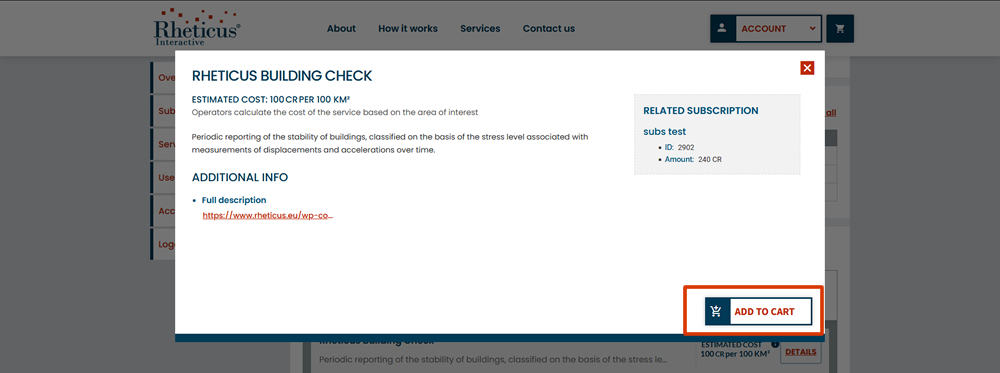
By clicking the “ADD TO CART” button (highlighted by the red polygon in Figure 3 ), the end-user will have access the wizard panel dedicated to the service activation shown in below.
Figure 3 : Rheticus Interactive platform interface – Service detail.
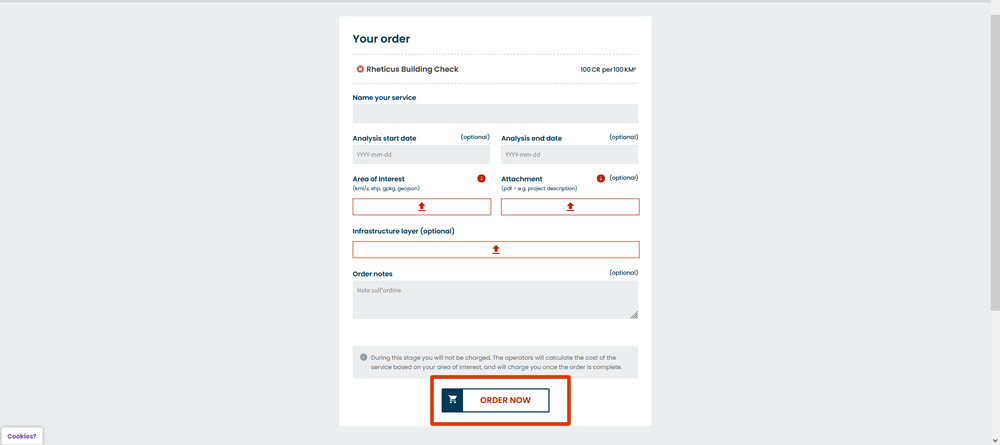
Within the service activation wizard shown in Figure 4 the user must provide the following required information:
Name Your service: Here the user can provide the preferred name for the service (e.g. Name of the service_name of the city/region)
Analysis start date and Analysis end date: Optionally the user may define the analysis start date and end-date. By default, the monitoring service will be performed according to the time interval specified in the technical specification of the service.
Area of Interest: upoad a file, containing the polygon of the Area of Interest - AOI (kml / shapefile / geopackage / gdb format - geographical reference system WGS84 - EPSG4326) on which he intends to request the activation of the service or a shapefile of the infrastructures to be monitored, depending on the selected service.
Infrastructure layer (optional): Optionally, depending on the selected service, the end-user may upload a file of the elements to be monitored varies according to the selected service (e.g. buildings layer for Rheticus Buildings Check service, Pipelines layer for Rheticus Network Alert service etc.)
Attachment (optional): Optionally, the user can upload file documents (pdf, ppt etc) to be shared with the service provider (Planetek Italia) if needed.
Order notes: the user can add notes related to the requested services if needed.
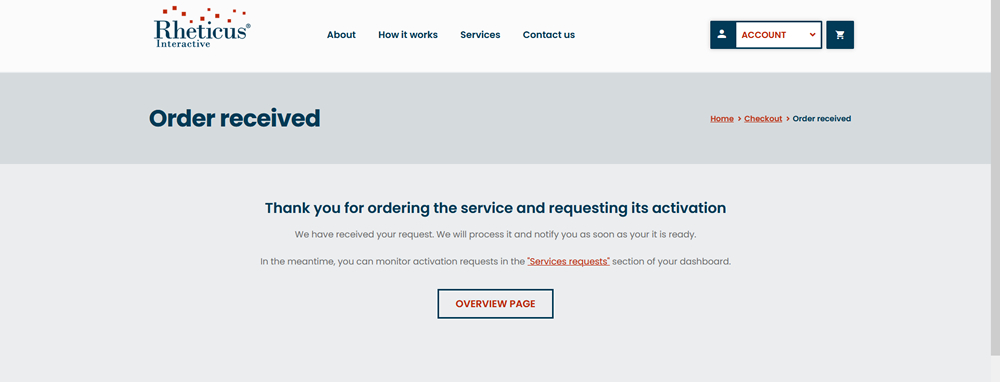
Once all the required information and files are uploaded, the end-user can send the activation request by clicking on “ORDER NOW” (highlighted by the red polygon in Figure 4 ). If the user has entered all the parameters necessary for activating the service, the system sends the notification of submission of a new activation request with all the details entered by the operator to “rheticus.interactive@planetek.it” and the message shown in Figure 5 will appear.
Figure 5 :Rheticus Interactive platform interface – Service request confirmation
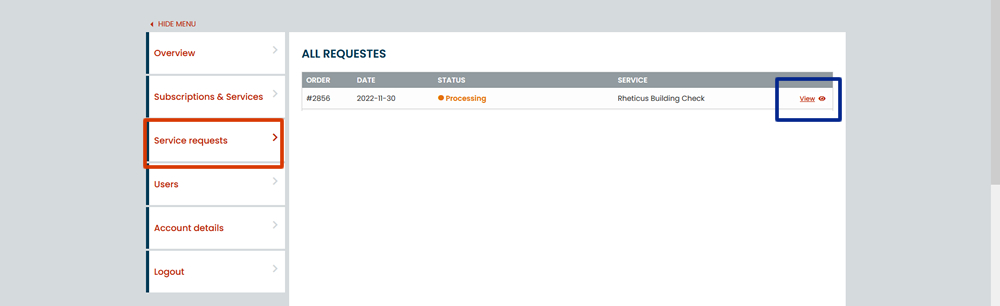
Service Requests
By clicking on the “Service Requests” menu (highlighted by the red polygon in the Figure 6 ), the end-user will see the list of all the requested services and the related details as shown in the figure below, the Order ID of the request, the date of the request, the request status, and the service name.
By clicking on the view button (highlighted by the blue polygon in Figure 6 ), it’s possible to visualize all the details of the specific activation request as shown in the figure below.
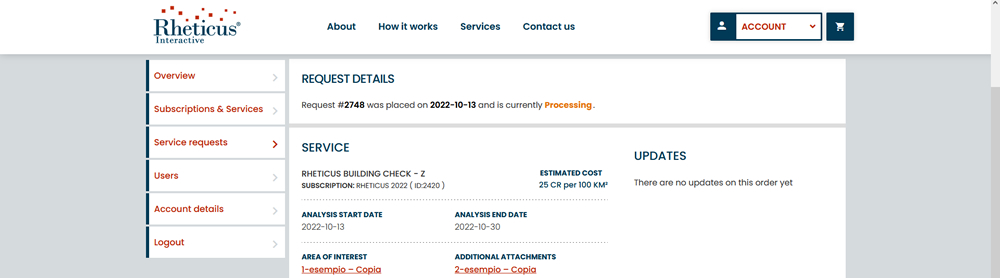
After each request sent, the status of the order is “Processing” while when the service will be active the status will change to “Completed” as shown in the figure below.
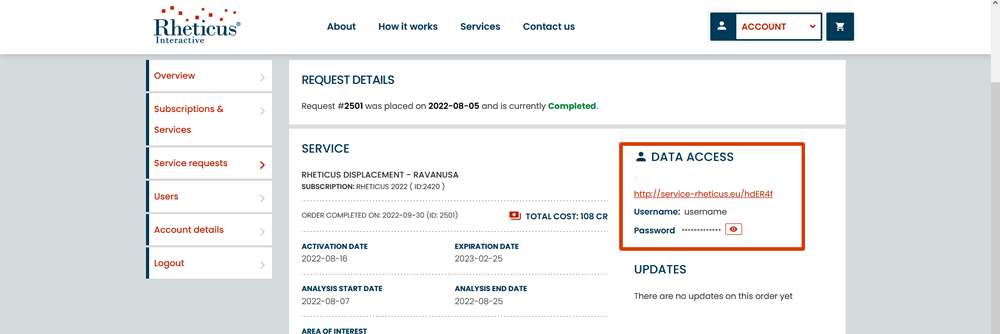
When the status of the requested service is “Completed”, by clicking on the “View” button (highlighted by the red arrow in Figure 8 ), the “request details” panel will include the service login information to access the results, as highlighted by the red polygon in the figure below.
Figure 9 : Rheticus ® Interactive platform interface – User Dashboard “Request Details” –
Service Login information
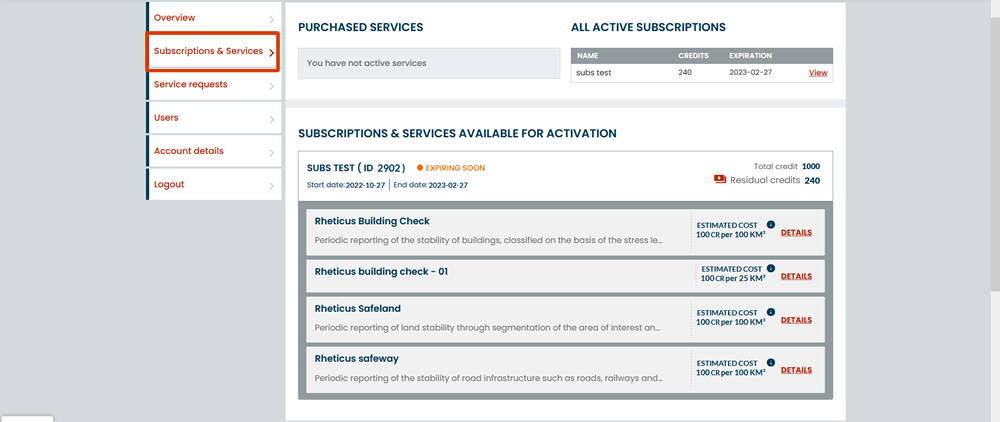
Subscription & Services
By clicking on the “Subscriptions and Services” menu (highlighted by the red polygon in Figure 10 ), the end-user will see the list of “purchased services”, the list of “All Active Subscriptions” and the list of “Subscription & Services available for activation”.
Namely, the system will show:
list of the purchased services;
list of the active subscriptions;
the total and residual credits available for each subscription;
the start and expiring date of each subscription;
the list of the available services for the activation.
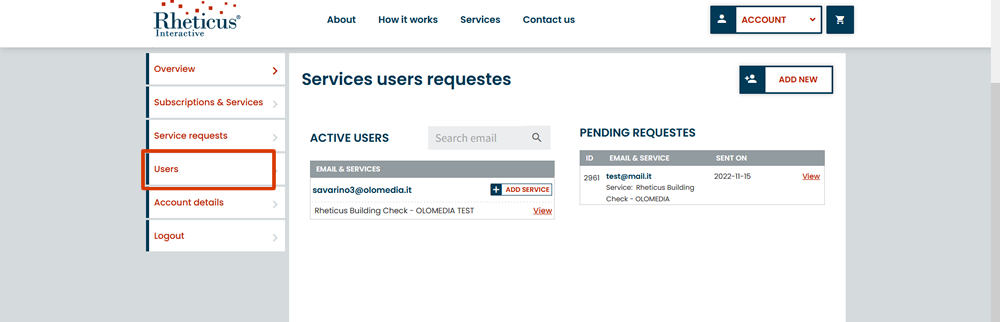
By clicking on the “Users” menu (highlighted by the red polygon in Figure 11 ) , the system will show the two panels containing respectively the list of the enabled “Active Users” and the “Pending Requests” of the users that will receive the access credentials to the specified requested services which can be specified within the “user activation” request wizard.
By clicking on the “ADD NEW” button (highlighted by the red arrow in Figure 11 ), the system will activate the wizard dedicated to request the activation of a new user account as shown in Figure 12 .
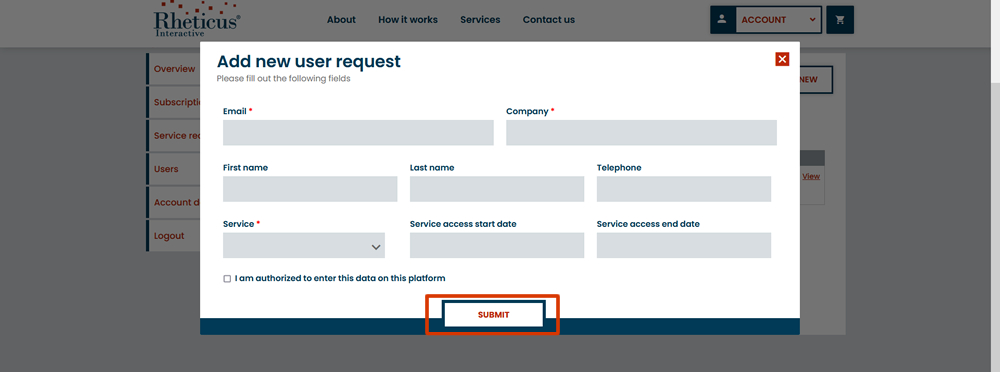
The operator must fill the “Add New User” wizard with all the user details (see Figure 12 ). The operator, in addition to the required fields - email, company, and service – may add the name, surname, telephone, and it may specify the start date and the end date of the desired service access to be provided to the user.
Once the operator will click on the “SUBMIT” button (highlighted by the red polygon in Figure 12 ), the system will show the user activation confirmation as shown in the Figure 13 below.
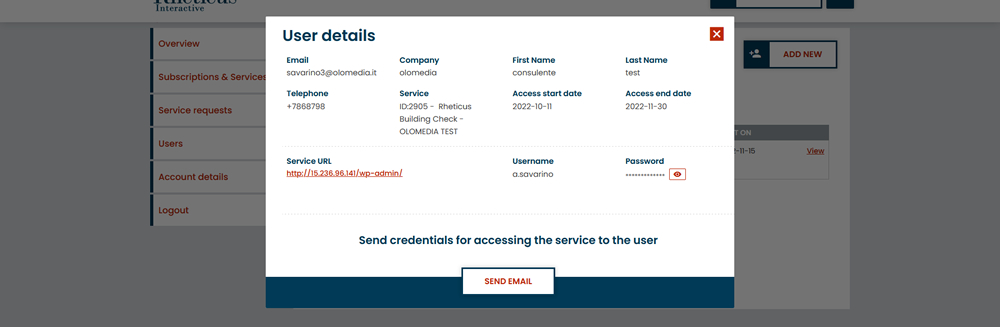
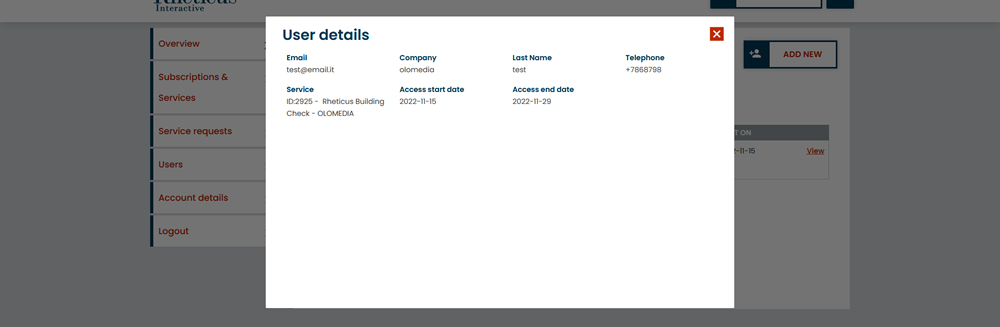
For each “Active User” (listed within the “Active User” panel shown in Figure 11 ), by clicking on “View” button, a panel containing the active user information will appear as shown in Figure 14 . By clicking on the “SEND EMAIL” button (highlighted by the red polygon in Figure 14 , the operator will be able to send by email the access information to the enabled end-user of the service.
Figure 14 : Rheticus ® Interactive platform interface – Active User details
For each “Pending Request” (listed within the “Pending Request” panel shown in Figure 11 ), by clicking on “View” button, the panel containing the user information detail will appear as shown in Figure 15 .
Figure 14 : Rheticus ® Interactive platform interface – Active User details
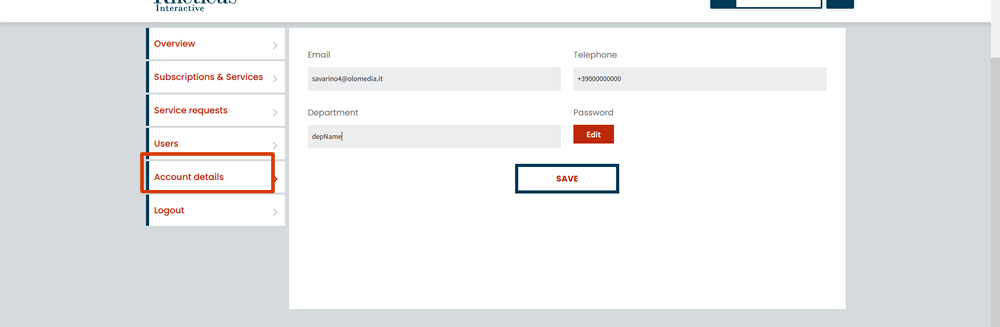
Account Details
By Clicking on the “Account details” menu (highlighted by the red polygon in Figure 16 ), the user will be able to update the personal data (email, telephone, department and password).
This site generates cookies. Some of them are technical cookies, necessary for its operation. There may be profiling cookies, generated by third parties for the creation of personalized advertisements: these are optional and can be disabled. See list of cookies
Examine the cookie lists, choose which profiling cookies to enable (if any), then click on 'Accept'. By clicking on 'Reject', you deny your consent to the enabling of any profiling cookie.